Product Support
Support Perfect Prep
Getting Started
What’s in the box?
-
1 x Perfect Prep® Formula Feed Marker
-
1 x 150ml Natural Start® baby bottle with slow flow teat
-
1 x milk storage lid
-
1 x Tommee Tippee® anti-bacterial water filter
Before using your Perfect Prep® for the first time, you need to run a cleaning cycle:
- This can take up to 10 minutes to complete. Do not fit your filter until instructed to do so and do not remove the water jug while water is being dispensed.
- Place an empty container under the water outlet, with at least 1 litre capacity.
- Add boiling water straight from the kettle into the water jug (D). The temperature warning light (L) will illuminate during the cleaning process.
- Press and hold the cleaning cycle button (H) for 2 seconds to start. If you need to pause, press the button again.
- Wait for hot water to run through the system.
- Pour away the hot water.
- Prime your filter by submerging it upright in a bowl of cold tap water. Tap the base of the filter to remove any air bubbles for 5 minutes.
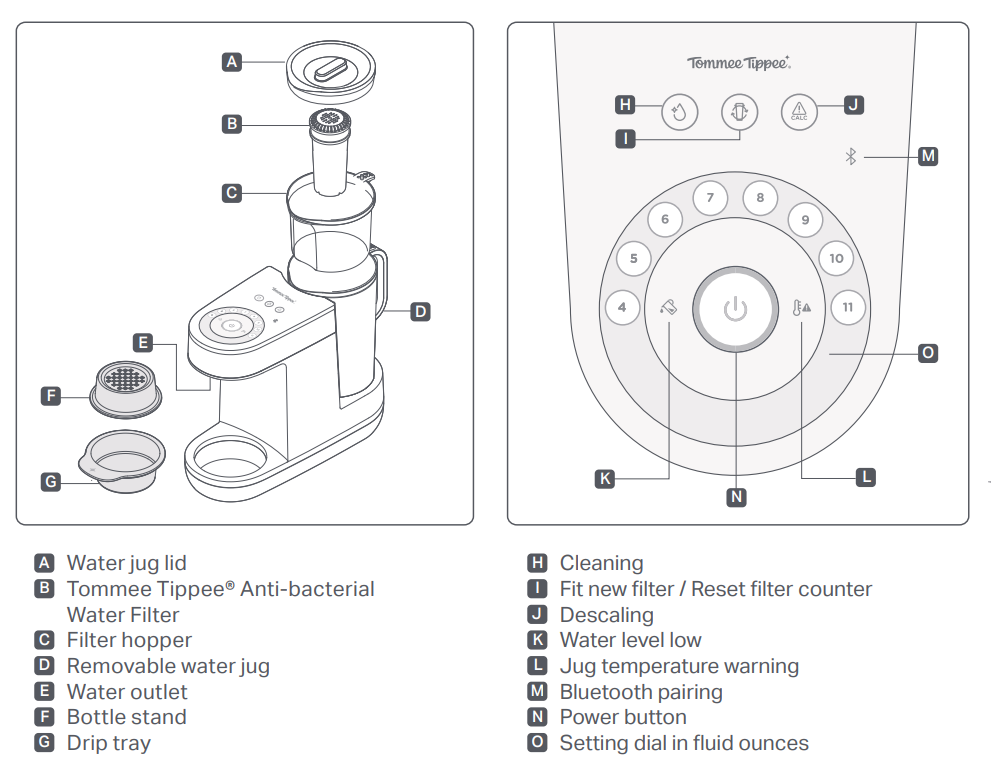
- Insert the new filter into the filter hopper and then insert filter hopper (C) into water jug.
- Fill filter hopper (C) to the maximum level.
- Place the lid (A) on the water jug (D) and add to your Perfect Prep® machine.
- Place an empty container under the water outlet.
- Press and hold filter replacement button (I) for 2 seconds. The cleaning light will illuminate.
- Press the cleaning button (H) for 2 seconds to flush the remaining water.
- Wait for the water to run through the machine. DO NOT REMOVE THE WATER JUG WHILE WATER IS BEING DISPENSED. DISCARD THE WATER.
How to use
Priming your filter
Before use, make sure that any air bubbles or loose particles are removed from the filter by submerging it in water for at least 5 minutes. This is necessary to enable water to pass through the filter once it is installed in the machine.
- Only ever touch the top of the filter when handling.
- Remove the filter from its packaging and remove the sticker from the top of the filter.
- Submerge the filter in a bowl filled with cold tap water.
- Shake and tap the base of the filter to remove any air bubbles (whilst submerged for 5 minutes).
- Your filter is now ready to fit into the filter hopper (C). Push downwards until it is positioned firmly.
Making a feed with your Perfect Prep® machine
Ensure your hands and all surfaces that come into contact with the Perfect Prep® and its components (including filter) are clean and dry.
- Check the water jug has enough water.
- Pour the formula powder into your bottle, following the manufacturer’s instructions.
- Place your bottle as close to the water outlet as possible using the bottle stand and drip tray to create a surface at the correct height. The drip tray and stand can be used in three formations to make low, medium and high surfaces.

- Put a bottle with formula powder under the outlet.
- Select your feed size (fl oz) from the dial and press Power button (N).
- A hot shot of water will be dispensed. While the hot shot is dispensing the Power button (N) will be flashing.
- Wait for the Power button (N) to pulse before removing the bottle. Add milk lid securely to the bottle and swirl until the formula has dissolved.
- FOR SAFETY, ADD THE COLD WATER WITHIN 2 MINUTES AFTER ADDING THE HOT SHOT. IF YOU TAKE LONGER THAN 2 MINUTES OR IF YOU STOP THE CYCLE, THE POWER BUTTON WILL ILLUMINATE WHITE. DISCARD THE FEED AND REPEAT THE BOTTLE PREPARATION PROCESS FROM STEP 1.
- Remove the lid and place your bottle back on the stand. Press the Power button (N) again to dispense the remaining water.
- The Power button (N) will flash to let you know the machine is preparing to dispense. Expect a slight delay before water is dispensed.
- The bottle is ready when the power button turns green. Add the sterilised teat, screw ring and hood and swirl.
FOR YOUR CHILD’S SAFETY ALWAYS CHECK FOOD TEMPERATURE BEFORE FEEDING BY TESTING ON A SENSITIVE PART OF YOUR SKIN.
Your bottle is now ready to serve!
If you need to stop dispensing hot or cold water, press the Power button (N) for 2 seconds. Discard your feed and start the bottle preparation again from step 1.
The unit is ready to be used again when the Power button (N) illuminates white.
Cleaning and maintenance
How often should I clean my machine?
You should run a clean cycle on your Perfect Prep® machine:
- Before its first use and then every 30 days.
- If your machine hasn’t been used for 1 week or more.
- When replacing your filter.
- After a de-scaling cycle.
How to clean
You must run a cleaning cycle before first use or when indicated by the cleaning icon. This can take up to 10 minutes to complete.
Always remove your filter before running a cleaning cycle.
DO NOT REMOVE THE WATER JUG WHILE WATER IS BEING DISPENSED.

Now move onto priming and fitting the filter to complete the cleaning cycle. If you are not replacing with a new filter, move straight to step 3 of fitting a filter.
How to replace the filter
Your Perfect Prep® machine needs a filter to work correctly. Replacement filters are available from the Tommee Tippee website.
- Prime your filter by submerging it upright in a bowl of cold tap water. Tap the base of the filter to remove any air bubbles for 5 minutes.
- Insert the new filter into the filter hopper and then insert filter hopper (C) into water jug.
- Fill filter hopper (C) to the maximum level.
- Place the lid (A) on the water jug (D) and add to your Perfect Prep® machine.
- Place an empty container under the water outlet.
- Press and hold filter replacement button (I) for 2 seconds. The cleaning light will illuminate.
- Press the cleaning button (H) for 2 seconds to flush the remaining water.
- Wait for the water to run through the machine. DO NOT REMOVE THE WATER JUG WHILE WATER IS BEING DISPENSED. DISCARD THE WATER.
How to descale your machine
The ‘calc’ or descaling icon (J) will illuminate when the unit requires descaling soon. If the light flashes, you should descale immediately.
The descaling process will remove deposits of calcium and other minerals in the system that may affect its performance.
- Remove the filter hopper and filter (always place them on a clean surface).
- Put the water jug in place.
- Add 500ml white vinegar to the water jug.
- Put an empty container under the outlet.
- Press and hold descale button for 2 seconds. If you need to pause, press the button again. Press and hold the same button for 2 seconds if you need to cancel.
- The descale cycle will stop and start to allow the vinegar to clean the machine. This is normal. When complete, pour the vinegar away.
The machine may make a loud sound for around 10 seconds at the end of the descale cycle. This is normal.
RUN THE CLEANING CYCLE TWICE TO REMOVE ANY REMAINING VINEGAR IN THE SYSTEM. SEE CLEANING CYCLE INSTRUCTIONS.
Troubleshooting
Why won’t my Perfect Prep connect to Bluetooth?
|
Icon |
Possible cause |
Solution |
|
Perfect Prep® unit too close to other electronic devices like microwaves may be affecting coverage. |
Move Perfect Prep® away from electronic devices like microwaves. |
|
|
Your mobile phone is on battery saving mode. |
Ensure your mobile phone is fully charged and is not on battery saving mode.
|
|
|
Location services on your mobile is disabled. |
Ensure the location services on your mobile is enabled. |
|
|
TT App does not have permission to phones BLE. |
Ensure permissions are enabled. |
What does a solid orange Bluetooth light mean on my Perfect Prep?
|
Icon |
Possible cause |
Solution |
|
No phone is paired with the unit. |
Press and hold Bluetooth button for 2 seconds to reset the Bluetooth connection and follow instructions on the Tommee Tippee® app to pair. |
What does a pulsing blue Bluetooth light mean on my Perfect Prep?
| Icon | Possible Cause | Solution |
| |
Perfect Prep® unit is searching for a device to pair with. | Follow instructions on the Tommee Tippee® app to pair. |
What does a solid red light on the power button and number 5 on the dial of my Perfect Prep mean?
| Icon | Possible Cause | Solution |
|
|
The machine may be too warm. Operating temperature range is between 5°C and 28°C. |
Empty the water jug and refill with cool tap water, switch off at the main power supply to reset. |

What does a flashing red light on the power button mean on my Perfect Prep?
| Icon | Possible Cause | Solution |
 |
The cycle has been stopped. |
You must discard the feed and start the bottle preparation again from step 1. The light will flash for 20 seconds before going back to white, this will indicate you can start again. |
What does a solid orange light on the filter replacement icon mean on my Perfect Prep?
| Icon | Possible Cause | Solution |
 |
It's time to think about replacing your filter. |
Order a new filter from the Tommee Tippee® app or visit our website (tommeetippee.com). |
What does a flashing orange light on the filter replacement icon mean on my Perfect Prep?
| Icon | Possible Cause | Solution |
|
The Perfect Prep® will not allow you to continue use until you replace the filter. |
The filter must be changed immediately for your child’s safety and health. Follow steps to replace your filter. |
What does a solid orange light on the descale icon mean on my Perfect Prep?
| Icon | Possible Cause | Solution |
 |
Your Perfect Prep® needs to be descaled. |
Follow the Descaling instructions. |
What does a flashing orange light on the descale icon mean on my Perfect Prep?
| Icon | Possible Cause | Solution |
|
The Perfect Prep® will not allow you to continue use until you descale the machine. |
Follow the Descaling instructions. |
What does a solid orange light on the cleaning icon mean on my Perfect Prep?
| Icon | Possible Cause | Solution |
 |
Your Perfect Prep® needs to be cleaned. |
Follow the Cleaning Cycle instructions. |
What does a solid orange light on the water level low icon mean on my Perfect Prep?
| Icon | Possible Cause | Solution |
 |
The water level in the water jug is too low. |
Ensure you have enough water in the water jug. |
What does a solid orange light on the temperature warning icon mean on my Perfect Prep?
| Icon | Possible Cause | Solution |
 |
The water in the jug may be too warm. Operating temperature range is between 5°C and 28°C. |
Empty the water jug and refill with cool tap water. |
Why has my Perfect Prep stopped working?
| Icon | Possible Cause | Solution |
|
If you have not replaced your filter and the filter replacement icon is flashing. |
The filter must be changed immediately for your child’s safety and health. Follow steps to replace your filter. |
Why is the filter taking so long to filter the water in my Perfect Prep?
| Icon | Possible Cause | Solution |
|
The filter requires priming before use to release any air bubbles and allow the water to flow. |
Fully submerge the filter and tap the base of the filter on the side of the jug or basin for approximately 5 minutes to release any air bubbles. |
Warranty
This product is covered by our exclusive two-year warranty when you buy directly from us!
What is covered
Any defect due to faulty materials or workmanship which occurs while the Product is covered by this Warranty.
What is not covered
This Warranty does not cover wilful damage, negligence or minor cosmetic damage caused by fair wear and tear.
How long are products covered?
This warranty covers Products for two years from the date of purchase when purchased directly from Tommee Tippee.
We will keep a record of when you purchased your Product in your Tommee Tippee account, there is no need to register.
What if I bought my product elsewhere?
If you have purchased any Tommee Tippee items from another retailer, online or in-store, you should address any issues you have to that retailer or website in the first instance. Your statutory rights are against the retailer that sold you the Product.
What if it has been longer than two years from purchase of the product?
This Warranty only covers Products for two years from the date of purchase. Do not worry if a defect occurs after this time, we still want to help, so please contact us in the same way you would if you were making a claim.
Support FAQ's
