Subscribe to Save
Subscription orders can be cancelled at anytime. Standard delivery will be charged on each subscription order. Find out more about subscriptions.
Why parents love our subscriptions...
-
They’re easy and fuss free
-
Your products are automatically sent to you
-
You save when you sign up for a subscription
-
You can cancel at any time

Supersteam Electric Steam Steriliser
Thank you for purchasing a Tommee Tippee Supersteam Electric Steam Steriliser. This product support page is here to help you learn how to use, clean and care for your steriliser, and to help with any queries you may have.
What’s in the box?

How to assemble
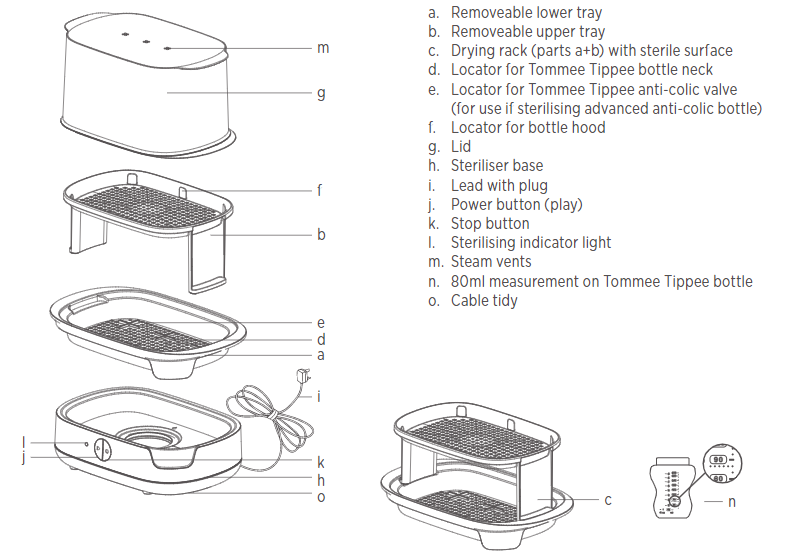
CLEAN YOUR STERILISER BEFORE FIRST USE - Refer to parts guide and diagram
- Do not connect to power at this stage.
- Remove all items from inside the steriliser base.
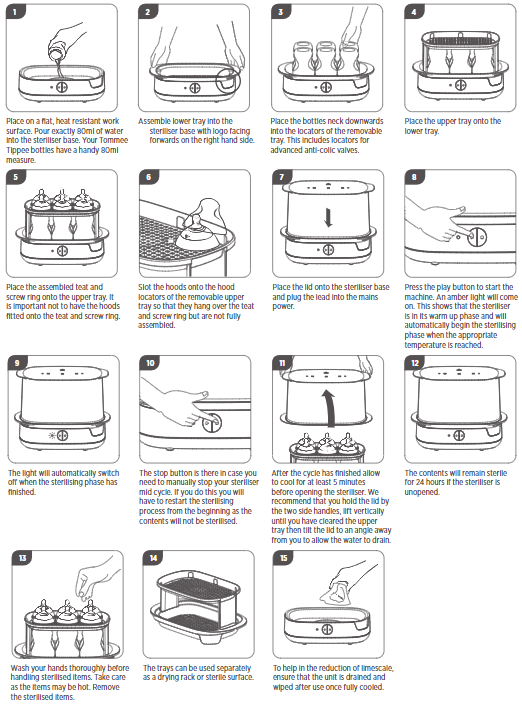
- Pour exactly 80ml of water into the steriliser base.
- Assemble the lower tray (a) with logo front facing and upper tray (a) and place in the steriliser base.
- Add the lid (g).
- Plug into the mains supply. Switch on at mains supply.
- Press the play button and it will light up amber to show the sterilising has begun.
- The light will switch off when sterilising has finished.
- Allow to cool for 5 minutes before turning off at the mains, removing the plug and steriliser lid.
- Remove upper tray and lower tray, pour away any remaining water and wipe dry. Your steriliser is now ready to use.
This steriliser is designed for use with Tommee Tippee bottles and feeding accessories (except bottle brush). The steriliser will hold a maximum of 6 Tommee Tippee bottles or a combination of fewer bottles plus soothers and breast pump parts.
How to use
Before sterilisation, wash and rinse thoroughly all bottles and feeding accessories in warm soapy water or in a dishwasher (top rack only) to remove any milk residues. Separate all components for washing and reassemble teat and screw ring for sterilising. (Any milk residue left on the bottles and components can cause discolouration of the heatplate and could affect the performance.)

Manual
Still need help?
If you’re still looking for an answer, get in touch with us here
Guidance on how to clean and maintain your Supersteam Steriliser:
Unplug and allow to cool before cleaning. After each use pour away remaining water from the steriliser base by tipping the steriliser sideways over a sink and wipe clean with a damp cloth only. Do not clean with abrasive cleaners or allow to come into contact with solvents or harsh chemicals, damage could result.
De-scaling
The frequency of de-scaling should be as follows:
Hard water: 14 days
Medium: 21
Soft: 28
You can find out your water quality via your water provider.
After each use pour away remaining water from the unit base by tipping the unit sideways over a sink and wipe with a damp cloth only. Unplug the unit and allow to cool before cleaning.
A build-up of limescale can negatively affect the performance of the unit. We recommend carrying out the descaling process as per above frequency guidelines to ensure the unit continues to work efficiently. Living in a hard water area can produce limescale quicker than other areas therefore descaling is required sooner.
Use a descaler that is suitable for use with stainless steel and use as per the manufacturer’s guidelines. Alternatively, you can use white vinegar or a descaling sachet to descale your unit, please use as per manufacturer’s guidelines.
Where no method is stated, 1 sachet to 200ml of hot water ratio can be applied. Once you have descaled then follow instructions under set up to perform a final cleaning cycle.
DO NOT use metal objects or scourers to clean your unit.
DO NOT use bleach or sterilising fluid to clean the unit.
DO NOT use abrasive or anti-bacterial materials.
DO NOT scrub the heat plate.
Manual
Still need help?
If you’re still looking for an answer, get in touch with us here
Steriliser will not work:
- Check the mains lead is plugged into the unit and the mains socket is switched on.
- Check the fuse is in the plug (in a UK plug only). Check the socket by plugging in another appliance.
- Check the appliance by plugging into another socket.
Excessive steam:
- Check that items are correctly loaded in steriliser.
- Use exactly 80ml of water.
Bottles come out with a chalky mark:
- Steriliser needs descaling. Refer to De-scaling Instructions.
Cycle takes too long to complete:
- Too much water in steriliser. Use exactly 80ml of water.
We’ve prepared some common questions and top tips to help you with your new steriliser.
Do I really need to sterilise my bottles?
We recommend that you do, but it’s entirely your choice. The main reason for using a microwave or electric steriliser is that they’re guaranteed to reach the 100°C needed to kill off harmful bacteria that can build up in milk, and you don’t get that guarantee with a dishwasher.
My steriliser isn’t working – what can I do?
We’re really sorry to hear that! Please follow the steps below to get your unit working again…
- Check the mains lead is plugged into the unit and the mains socket is switched on.
- Check the fuse is in the plug (in a UK plug only)
- Check the socket by plugging in another appliance
- Check the sterilising by plugging it into another socket
Should I get a lot of steam whilst the unit is on?
Not really. If you have way more steam than you’d expect, it could be that you’ve just got a few too many items inside. Check that items are correctly loaded into the steriliser. There are marked areas on the trays to show where to put your bottles, and if you’re popping other items like teethers or soothers in, just be sure to space these out evenly.
Don’t overfill the machine with too many products as this reduces how efficiently the steriliser works and it may not sterilise properly.
The correct amount of water is 80ml. More than 80ml of water in the steriliser base will increase the cycle time. Less than 80ml may not sterilise the items properly.
Why are my bottles are coming out of the steriliser with chalky marks?
If you are seeing chalky residue on items in your steriliser, that’s a sign that it needs descaling. Please refer to the descaling instructions.
To help you identify limescale; here’s a picture of your heat plate fresh out the box, (A) and here’s a picture of a heat plate that hasn’t been descaled (B). If you notice a dark brown appearance, this is likely to be burnt on limescale which means you may need to descale the machine over a longer period e.g. overnight, or up to 24 hours.

There are flaky bits in the machine - what's causing it?
This will be due to a build-up of limescale that's loosened from the heat plate at the base of your machine, so we'd recommend giving it a good descale. We recommend using a descaler that’s suitable for use with stainless steel i.e. kettle, iron, and coffee machine de-scalers. Use as per the manufacturer's guidelines.
You could watch this quick video on how to descale your electric steam steriliser
It’s vitally important to regularly descale your steriliser to avoid operating issues and damage to the heat plate, which is in the bottom of the machine.
Should there be water left in the bottom once its finished?
Yes, it’s common to have droplets of water remaining, the majority of the 80ml water should have evaporated during the sterilisation cycle. Just empty it out once you’re finished and dry thoroughly to use again.
Why does my heat plate look rusty?
This will be due to limescale. We recommend using a descaler that is suitable for use with stainless steel i.e. kettle, iron, and coffee machine de-scalers. Use as per the manufacturer's guidelines.
If you notice a dark brown appearance as shown in the image below, this is likely to be burnt on milk which means you may need to descale the machine over a longer period of time e.g. overnight or up to 24 hours.

Why do my bottles still have marks on after I sterilise?
The chances are the marks are milk residue. Sterilising removes bacteria, but bottles still need to be washed beforehand to remove any bits of milk clinging on inside. Warm soapy water will do the trick - thoroughly wash, then rinse and pop them in your steriliser.
How should I store my steriliser?
If you want to store your steriliser to use again, we’d suggest that you run a full descaling programme to ensure all limescale is removed and to give it a clean. Ensure the unit is thoroughly dry and securely wrapped in bubble wrap and cardboard to keep it nice and snug. When deciding where to store it, we’d suggest somewhere nice and dry to avoid any damage.What are the teat tongs for?
The teat tongs are included with the steriliser so that you can safely remove freshly sterilised items without touching them with your fingers and potentially contaminating them. You can remove the teats with the teat tongs and then use the screw ring to re-assemble with the bottle.
Teat tongs should also be used to squeeze any residual water from the baglet of a soother. This is important to do after each wash/ sterilising cycle, to avoid the risk of burning your little one’s mouth.
Should I dry the bottles before using them?
Thankfully, you can cross this off your to-do list. Any water left inside the bottles after sterilisation is sterile and won’t collect germs, so there’s no need to dry. In fact, wiping the inside of a bottle after sterilisation could add even more germs, so it’s best not to!
How do I reassemble my bottles when they’re ready?
Just reassemble as normal, but wash your hands thoroughly first, or use the teat tongs provided if you have them. The idea is to keep the bottle as clean and sterile as possible.
If you don’t want to leave them all in the steriliser for the 24-hours, you can reassemble all bottles straight away and store them in a dry location. The fully assembled bottles will be ok to use for the same 24-hour period. Any unused bottles, after the 24 hours should be popped back in for a fresh sterilising cycle.
Manual
Still need help?
If you’re still looking for an answer, get in touch with us here
This product is covered by our exclusive two-year warranty when you buy directly from us! For full terms and conditions, please click here.
What is covered?
Any defect due to faulty materials or workmanship which occurs while the Product is covered by this Warranty.What is not covered?
This Warranty does not cover wilful damage, negligence or minor cosmetic damage caused by fair wear and tear.How long are Products covered?
This Warranty covers Products for two years from the date of purchase.
We will keep a record of when you purchased your Product in your Tommee Tippee account, there is no need to register.
What if I bought my product elsewhere?
If you have purchased any Tommee Tippee items from another retailer, online or in-store, you should address any issues you have to that retailer or website in the first instance. Your statutory rights are against the retailer that sold you the Product.What if it has been longer than two years from purchase of the Product?
This Warranty only covers Products for two years from the date of purchase. Do not worry if a defect occurs after this time, we still want to help, so please contact us in the same way you would if you were making a claim.


