Subscribe to Save
Subscription orders can be cancelled at anytime. Free delivery on all subsequent subscription orders. Find out more about subscriptions.
Why parents love our subscriptions...
-
They’re easy and fuss free
-
Your products are automatically sent to you
-
You save up to 10% when you sign up for a subscription
-
You can cancel at any time

Advanced Anti-Colic Bottle
Thank you for choosing our Advanced Anti-Colic Bottles! Here is everything you need to know to get the best experience with your bottle, for you and baby!
Parts guide
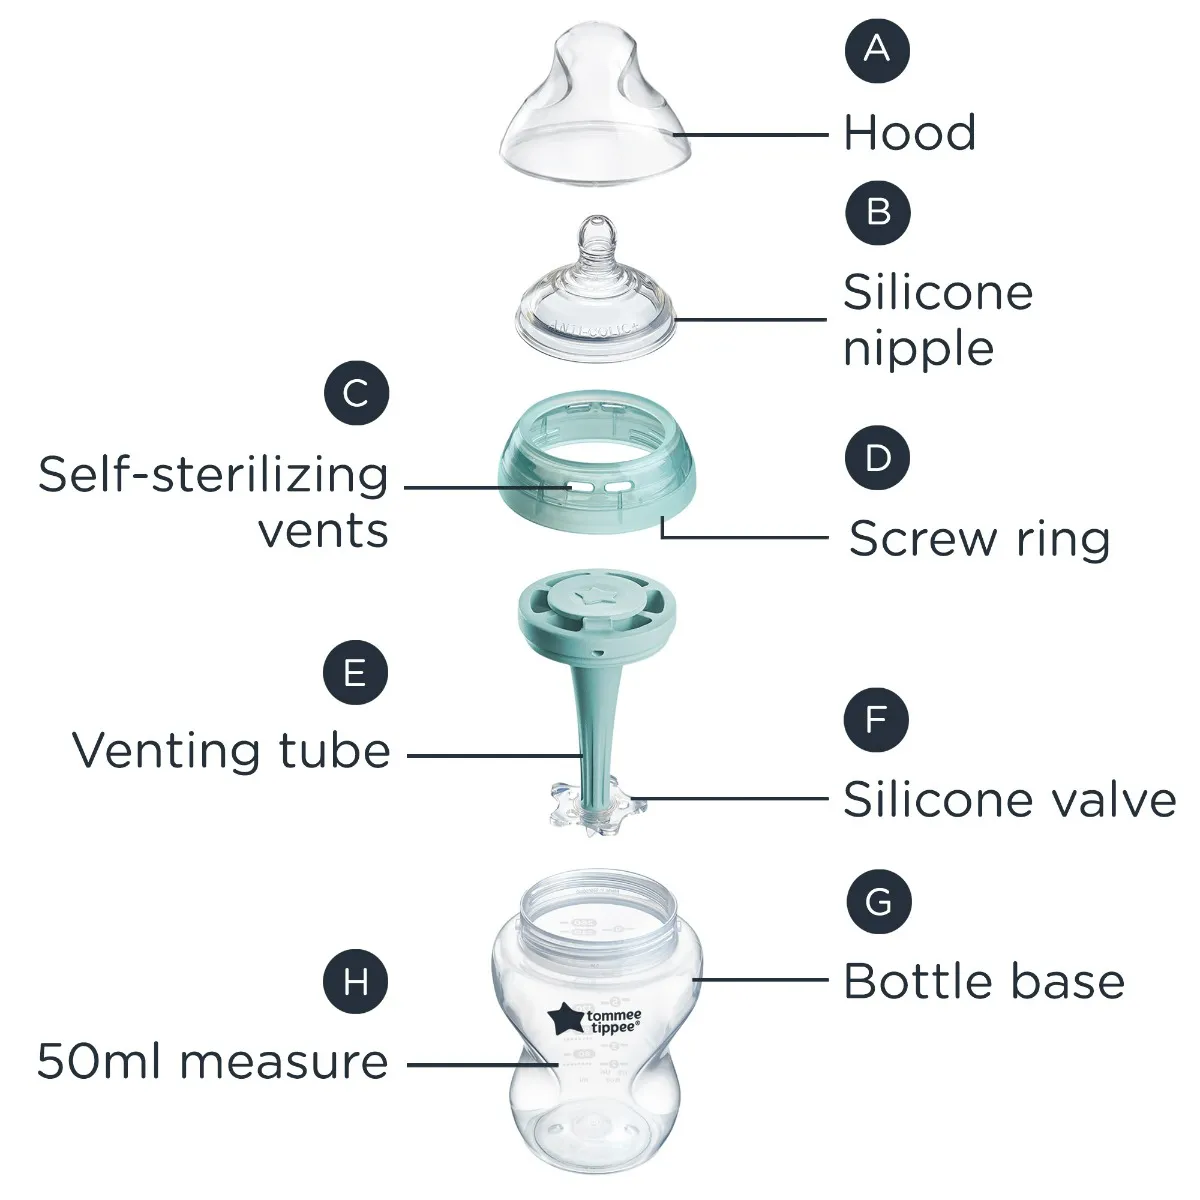
Preparing for use
Before first use disassemble and place all the components in boiling water for 5 minutes. This is to ensure hygiene.
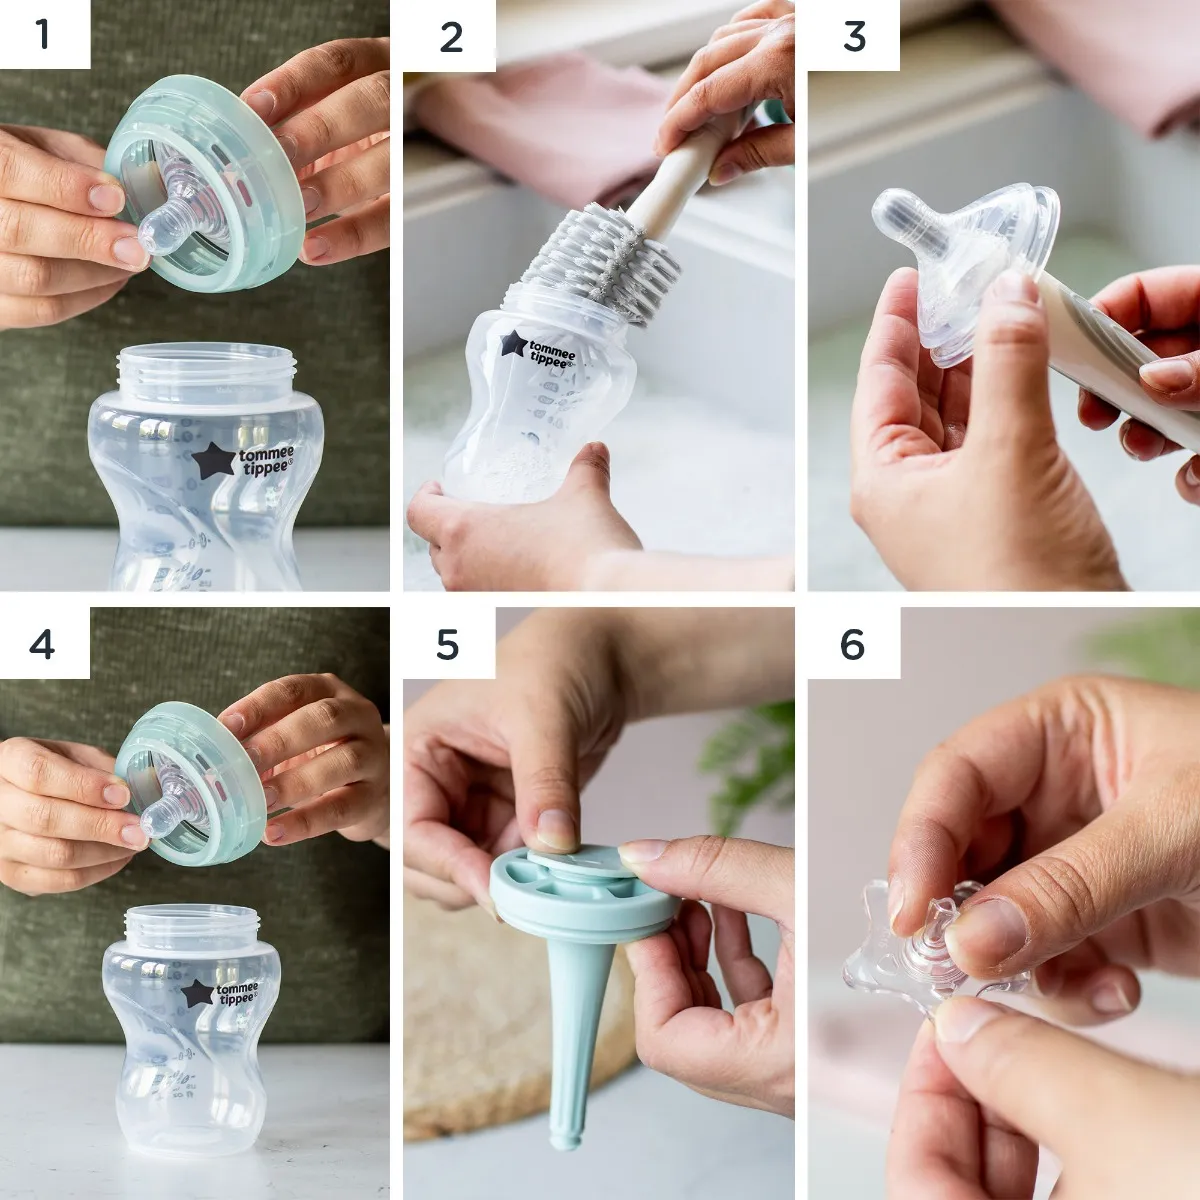
- Disassemble your bottle
- Wash ALL parts in warm, soapy water and rinse or use a dishwasher (top shelf only).
- Use a nipple brush to gently clean the nipple (B), do not turn inside out as you may damage it.
- Reassemble the nipple (B) and screw ring and then place all parts in boiling water for 5 minutes or use another method of sterilization such as a UV or steam sterilizer or cold water tablet/liquid solution (ensure you follow the manufacturer’s instructions).
- After sterilizing reassemble your bottle as per the diagram ready to use. When assembling your bottle it is important that you check the lid of the venting tube (E) is fully closed.
- To prevent the nipple (B) from collapsing, check that the slit in the silicone valve (F) has not sealed. If it has sealed pinch it gently between your fingers to ensure it’s open.
How to self-sterilize in a microwave
This method allows you to easily sterilize bottles using a microwave. Before sterilizing, always disassemble and wash all components thoroughly and rinse in clear water or use dishwasher (top shelf only).
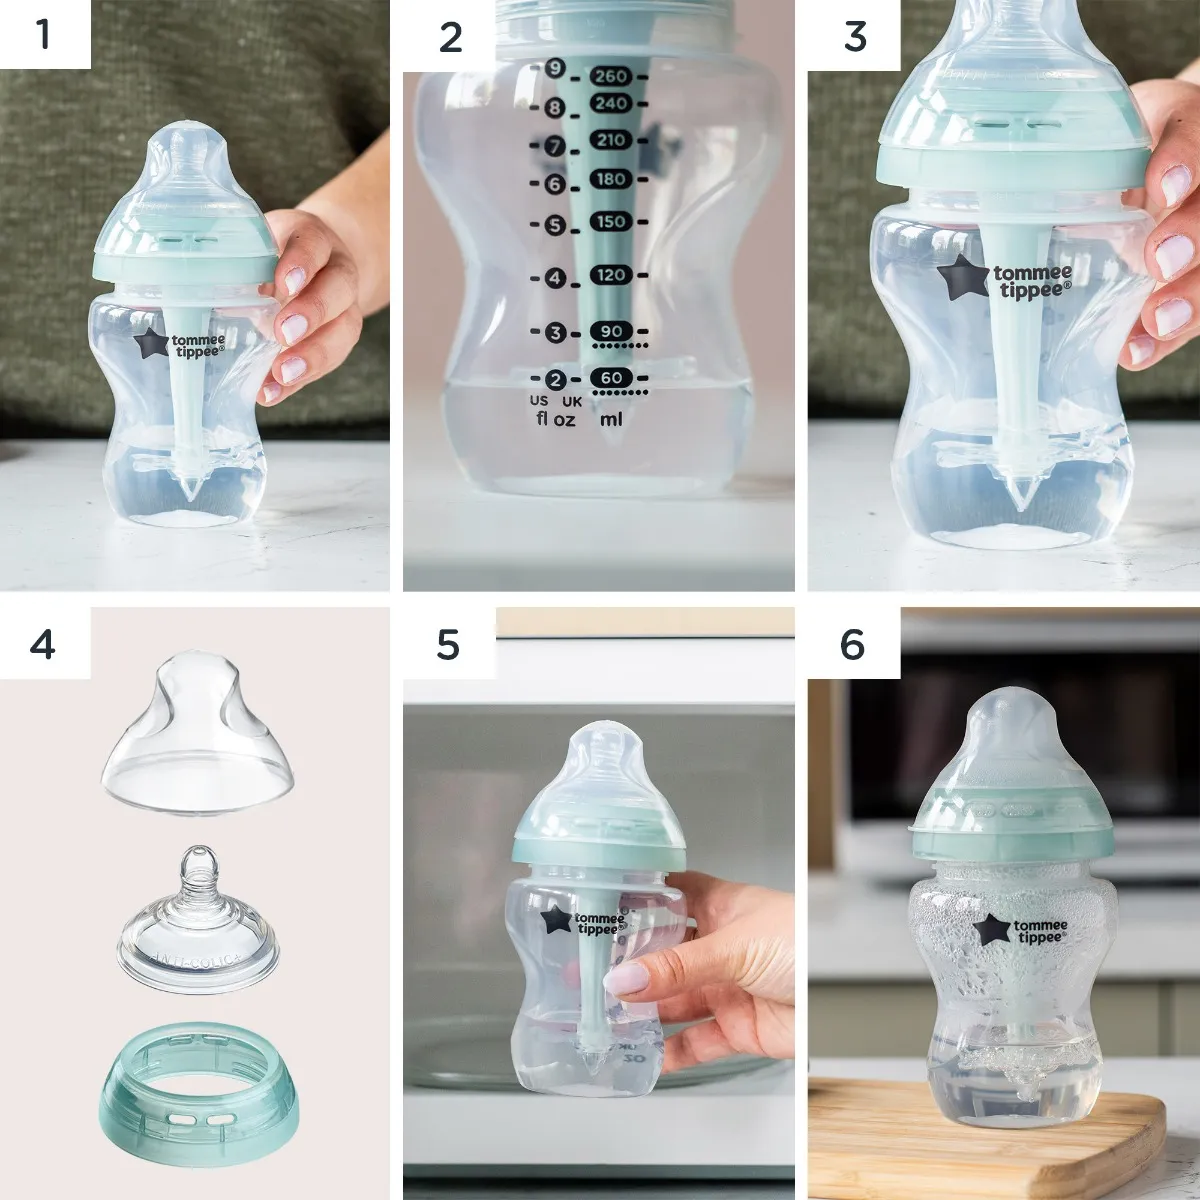
- Assemble the nipple (B) in the screw ring (D) and click the bottle hood (A) in place.
- Pour exactly 50ml of water into the bottle base (G). The bottles have a 50ml measure (H).
- Assemble the venting tube (E) with the silicone valve (F) and then place the bottle base (G) as per the diagram. Ensure the inside of the venting tube is thoroughly washed and dried before self-sterilizing.
- Loosely place the assembled hood (A), nipple (B), and screw ring (D) on top of the bottle base (G). Do not tighten the lid to allow pressure release.
- Place in the microwave for 3 minutes. To sterilize multiple bottles see table below. Allow the bottle to cool down for at least 5 minutes before removing from the microwave. For glass bottles, allow 30 minutes to cool down with the microwave door open.
- Pour out residual water and screw the assembled hood (A), nipple (B) and screw ring (D) on to the bottle base (G) ready for use. Ensure the lid of the venting tube (E) is closed. After the self-sterilization the bottle and nipple will remain sterile for 24hours if the bottle is unopened and fully assembled. Always store the bottles fully assembled.
- To prevent the nipple (B) from collapsing, check that the slit In the silicone valve (F) has not sealed. If it has sealed pinch it gently between your fingers to ensure it’s open. Microwave recommended times for all bottle sizes. Based on microwaves from 700 to 1000 Watts.

Storage and use
- Inspect before each use and pull the feeding nipple in all directions.
- Always clean and sterilize before each use.
- Keep away from solvents or harsh chemicals.
- Do not allow the product to come into contact with oil based foods.
- Not suitable for use in a conventional oven or a combination microwave oven with the grill feature switched on.
- Do not leave a feeding nipple in direct sunlight or heat, or leave in disinfectant (sterilizing solution) for longer than recommended, as this may weaken the nipple.
- Nipples are recommended to be replaced at lease every 2 months for safety and hygiene reasons.
- Please dispose of this product and packaging responsibly.
How to clean
- Disassemble your bottle
- Wash ALL parts in warm, soapy water and rinse or use a dishwasher (top shelf only).
- Use a nipple brush to gently clean the nipple (B), do not turn inside out as you may damage it.
- Reassemble the nipple (B) and screw ring and then place all parts in boiling water for 5 minutes or use another method of sterilization such as microwave, UV, steam, or cold water tablet/liquid solution (ensure you follow the manufacturer’s instructions).
- After sterilizing reassemble your bottle as per the diagram ready to use. When assembling your bottle it is important that you check the lid of the venting tube (E) is fully closed.
- To prevent the nipple (B) from collapsing, check that the slit in the silicone valve (F) has not sealed. If it has sealed pinch it gently between your fingers to ensure it’s open.
What happens if I put the venting tube in straight after making a feed?
Placing the venting tube into boiling or hot liquid won’t damage it, but it may force liquid up the tube which can cause your bottle to leak when it’s assembled. We recommend following our ‘how to guide’ to make a feed.Natural Start nipples look the same, can I use them on Advanced Anti-Colic bottles?
No, you can’t use Natural Start Nipples on Advanced Anti-Colic bottles. Natural Start nipples have a built-in air valve, and don’t work with our Advanced Anti Colic bottles. The valve in your Advanced Anti Colic bottles is situated inside the bottle, attached to the end of the venting tube and is shaped like a star. It’s important that you make sure you match the right nipple to the right bottle.Can I buy bottles with faster flowing teats?
All of our bottles except the 340ml version currently come with slow flow nipples as standard, as they’re best for newborns and most parents generally stock up on bottles before baby arrives. Our 340ml bottle comes with a medium flow nipple.
As your baby grows and can feed more quickly, you can buy faster flowing replacement nipples.
We have medium flow nipples, which most babies are ready for at around 3 months, and a fast flow nipple which is best from around 6 months. The ages are only guides though - you know your baby better than anyone and will be able to tell when they’re ready for a faster flow.
I've heard bad things about BPA - Is it in your bottles? (& What is it anyway?)
All Tommee Tippee bottles are BPA-free. They’re made of a plastic called polypropylene that’s lightweight, easy to clean, and completely safe. BPA - that’s (CH₃)₂C(C₆H₄OH)₂ for you science geeks - is a chemical that’s been used in some plastics since the 1960s and it’s believed to mess around with your hormones. It’s generally not good, so we don’t use it.
Can I store breast milk in bottles?
Yes, our bottles love to look after your breast milk. We even have special lids that you can pop on to store your milk in the fridge or freezer. If you’re expressing and storing breast milk, our Express and Go™ range may be handy too - it features a clever pouch that you use to express, store, warm and feed (it’s our all-in-one show). This means there’s no need to transfer milk at any stage, so you’ll never lose a precious drop.Can I recycle my bottles when I'm done?
Yes. Our Natural Start and Advanced Anti-Colic bottles are made from polypropylene (PP) that can happily be recycled.How does the venting tube work?
The air draws into the tube and through the star valve away from baby’s milk.
The star valve is a one-way system and seals with every gulp, it prevents milk travelling back up the tube to stop any leaks.
Why are there small holes in the screw ring?
The small holes allow the steam to flow and reach the external surface of the nipple and the internal surface of the hood.
PLEASE NOTE: It’s important that the silicone nipple is not tightened on to base when self-sterilizing in microwave to allow the steam to flow in.
How does the self-sterilizing function work?
The 50ml of water in the bottle will turn into steam when microwaved*. The steam reaches the temperature necessary to sterilize, killing virus and 99.9% of bacteria. The steam travels around the bottle sterilizing the surface of the tube and silicone valve and through the holes in the screw ring to reach the external surface of the nipple and the internal surface of the hood.
*Based on microwaves from 700 to 1000 Watts.
Ensure the lid of the venting tube is fully closed before sterilizing. You can do this by pressing the centre of the lid with your thumb.
Ensure the inside of the venting tube is thoroughly washed and dried before self-sterilizing.
PLEASE NOTE: It’s important that the silicone nipple is not tightened on to base when self-sterilizing in a microwave to allow the steam to flow.
Does my baby need an anti-colic bottle?
For peace of mind, all of our Tommee Tippee bottles are anti-colic as standard. This means they’re designed to minimise the amount of air that baby’s consume with their milk and for all babies, this can only be a good thing. However, if your baby does develops colic symptoms (about 20% of babies will) then that’s when we’d recommend using our Advanced Anti-Colic bottle. With an advanced vented tube it draws air away from your baby’s milk, to help combat colic, gas and reflux. It’s our best bottle for reducing feeding discomfort. Whilst our Natural Start bottles have an anti-colic valve in the nipple which helps to reduce symptoms of colic by preventing excessive air from getting into your baby’s milk and only if your baby.
Manual
Still need help
If you’re still looking for an answer, get in touch with us here

