RSP:
$14.99
Subscription orders can be cancelled at anytime. Free delivery on all subsequent subscription orders. Find out more about subscriptions.
They’re easy and fuss free
Your products are automatically sent to you
You save up to 10% when you sign up for a subscription
You can cancel at any time

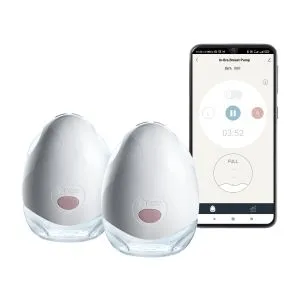
Great to see that you’ve purchased a Tommee Tippee Made for Me Double Electric Breast Pump. To help you get started and to keep it working effectively, we’ve added all the guidance you should need, plus some handy hints, tips and troubleshooting advice.
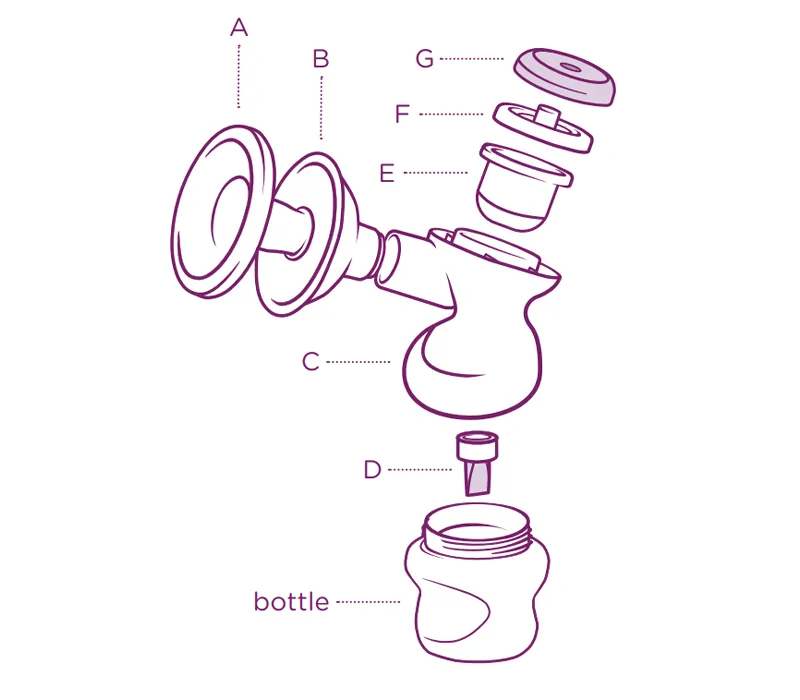
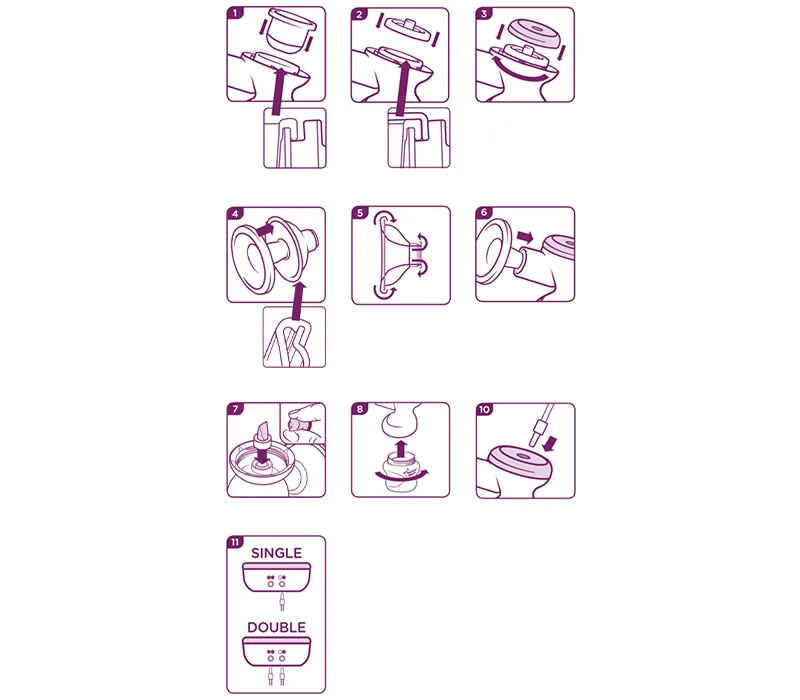
Get to know your breast pump. You may be wondering how your breast pump handset fits together. Don’t worry, it will soon become second nature.
You can wash these parts:
A. Cup - rounded, soft silicone part that fits into the horn to sit comfortably against your breast. Gently massaging to stimulate your milk flow.
B. Horn – trumpet-shaped part that supports the cup while you use the pump
C. Body –duck-shaped part that you hold and connects the horn and cup to your bottle.
D. Duck-bill valve (purple) – small one-way valve that lets breast milk into your bottle but doesn’t let it back through as you move around.
E. Diaphragm – small, transparent cup-shaped part that keeps the “wet” side and the “dry” side of the breast pump separate. This makes it a closed pump system.
F. Diaphragm cap – seals to the diaphragm.
G. Lid (purple) –allows you to connect the air tube to the pump and close the pump handset.
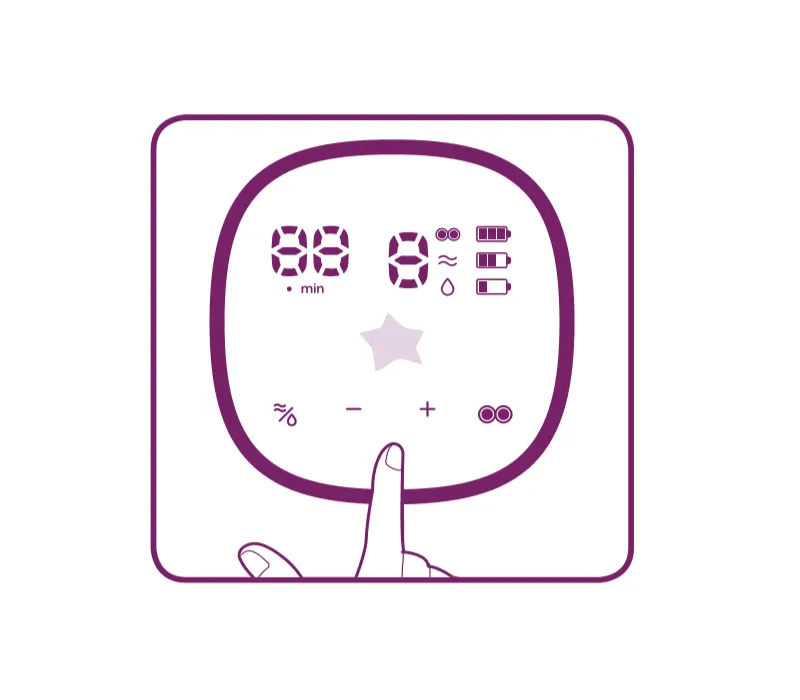
A. Power- use to turn pump on and off, and pause during pumping.
B. Mode button - switch between massage and pump modes.
C. Double/single pump - switch between double and single pump modes.
D. Increase suction power
E. Decrease suction power
F. LED display – timer.
G. LED display – shows mode level, there are 5 massage levels and 9 expression levels.
H. LED display – shows battery charge level.
I. Air tube connector – connect your air tubes to the power unit here.
J. USB socket – connect this to a USB power source or adapter to recharge.
DO NOT wash these parts:
Air tube –plastic tube with purple connectors at each end that attach your breast pump to the power unit.
Power unit –small, portable motor that powers the massage and suction features of your breast pump.
Do’s and Don’ts
X DO NOT wash or sterilize the air tube. This can cause bacteria to build up in the tube and will damage the power unit.
X DO NOT wash, sterilize or heat the power unit. This is dangerous and will damage your power unit
✔DO wash your hands with soap and water and dry thoroughly before handling your breast pump.
✔DO thoroughly clean and sterilize all the parts of your breast pump that come into contact with milk, following the instructions below. Do this before you use it for the first time and after every use.
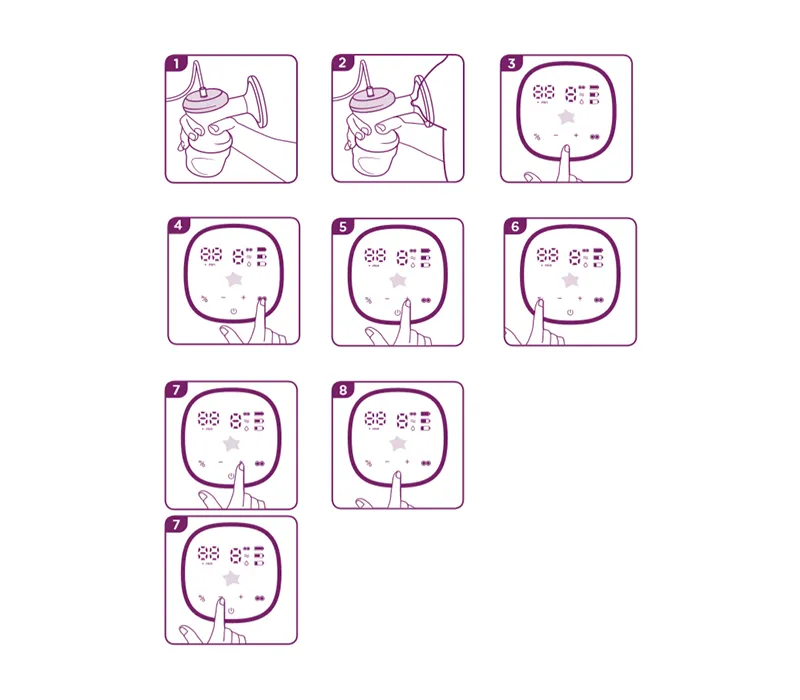
How do I put my Made for Me Electric Breast Pump together?
Each time you use your breast pump, check all parts of the pump and power unit for any damage.
Wash your hands with soap and water and dry thoroughly before handling your breast pump.
Make sure that all parts of the pump have been washed, cleaned and sterilized, and are completely dry.
How do I charge the electric breast pump power unit?
The power unit for your breast pump uses a battery similar to the one in your mobile phone. Charge it up so that you can power your breast pump anywhere and even move around while you’re using it.
The power unit will come with some charge in it, but you should fully charge it before first use.
To charge the power unit
You can attach your breast pump to the power unit and use it while the battery is charging. It just means you need to stay close to the USB power source.
What do the symbols on the electric breast pump power unit mean?
How do I stop expressing with my electric breast pump?
How do I use my electric breast pump?
You’ve cleaned and assembled your breast pump, and powered up your power unit. You’re prepped and ready to go…
The best time to use your breast pump is after the first feeding of the day (unless your breastfeeding advisor has told you something different.)
Make sure hands are washed and dried before touching your breast pump, and breast pump parts are washed and sterilized.
Get yourself in a comfortable position, like sitting, standing or half-lying. The important thing is to keep the pump handset vertical while you hold it against your breast. You’ll also need a flat surface nearby to put the pump and bottle on when you’re done.
The illuminated LEDs and quiet pump mode allow you to use the pump at night without disturbing others when you want to keep the lights low.
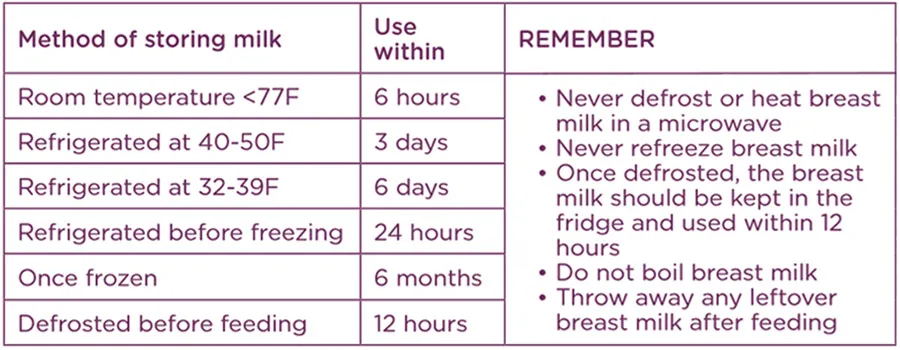
What’s the best way to store my breast milk?
When you want to freeze breast milk, allow space at the top of your bottle for it to expand. It’s easiest to freeze milk in individual feeding quantities of 60-125ml/2-4oz.
Your breast milk may separate out into layers when you store it. Give it a shake to re-mix it thoroughly before feeding your baby.
Thaw frozen milk in the fridge or by standing your bottle in lukewarm water until it has reached body temperature, or use a Tommee Tippee bottle warmer.
If you want to take pumped milk out and about with you, make sure it stays cold or frozen until you need to feed your baby.
How do I use my electric breast pump on the go?
Your Tommee Tippee Made for Me Electric Breast Pump is designed to give you the freedom to express/pump breast milk at home, at work or anywhere that’s comfortable for you. With the portable, rechargeable power pack you don’t need to be connected to a power socket to use it, so you can even move around as you’re expressing/pumping.
Important things to remember:
To keep your breast pump sterile on the go, carry it in a Tommee Tippee Travel and Microwave Sterilizer bag. Do not put the power unit or air tube in the sterilizer bag.
Always store your breast pump handset and power unit in a cool, dry place away from heat and moisture and out of direct sunlight.
How do I clean my Made for Me Electric Breast pump?
Separate each part of each pump handset and wash in clean soapy water. Don’t use water that you’ve used for cleaning other products.
DO NOT wash the air tubes.
Rinse thoroughly with clean water.
You can also wash the pump handset parts in the top rack of a dishwasher.
Place the purple duck-bill valve in the cutlery rack or dishwasher basket to keep it safe.
Sterilize all parts of both pump handsets using either cold water sterilization, microwave sterilization, boiling water, or electric steam sterilization.
DO NOT sterilize the air tubes.
For best results use Tommee Tippee electric or microwave sterilizers.
If you need to clean the power unit, USB cable or air tubes, wipe the outside with a clean damp cloth. DO NOT wash any of these parts.
Can I put my Made for Me Electric Breast Pump in the dishwasher?
You can wash the pump handset components in the top rack of a dishwasher. Place the purple duck-bill valve in the cutlery rack or dishwasher pod to keep it safe.
DO NOT wash the air tube or power unit.
If you need to clean the power unit, USB lead or air tube, wipe the outside with a clean damp cloth.
How do I sterilise my Made for Me Electric Breast Pump?
Sterilize all parts of the pump handset using either cold water sterilization, microwave sterilization, boiling water, or electric steam sterilization.
DO NOT sterilize the air tube.
For best results use Tommee Tippee electric or microwave sterilizers
How do I clean my Made for Me Electric Breast Pump?
Separate each part of the pump handset and wash in clean soapy water. Don't use water that you've used for cleaning other products.
Rinse thoroughly with clean water.
Help, the pump is making a funnny sound
Check if you have selected single or double mode and that you have the air tube(s) connected correctly. If you are using a single pump and have the double mode selected (shown by the double circle lit up on the LED display), or have a single air tube attached to the wrong connector, the pump will run continuously, and make a noise when it’s trying to provide suction to the unattached pump handset. Choose the correct mode and connection for single or double pumping.
What should I do if using the breast pump is painful?
If it's painful, please seek advice from your Breastfeeding Coordinator or health care professional. If it doesn't feel comfortable please follow the steps for repositioning as detailed in the manual.
How do I place the breast pump on my breast?
When pumping, your nipple should sit comfortably in the center of the silicone cup and will be extended down the tube of by gentle suction. The pump creates a seal around your areola and nipple. You do not need to cover the whole of your areola or breast covered by the horn. Do not force your breast or nipple into the horn.
Don’t tilt the bottle while pumping. Keep it upright to keep your milk flowing into the bottle.
What mode and power setting should I use?
You don’t need strong suction to express milk from just behind your nipple. Use the mode and power setting that feels most comfortable for you. This may be different at different times of day or at different stages of your breastfeeding experience.
Help, my breast pump isn’t working as well as it usually does. What should I do?
If air is getting in around the silicone cup, your pump may not suck milk effectively. Adjust your position and replace the cup on your breast so that it feels comfortable and the pump is expressing milk.
How long does it take to charge my electric breast pump?
Charging time may vary depending on voltage and equipment used, from 3-6 hours. When the power unit is fully charged all three of the LED lights will remain on.
The LED lights on the power unit flicker. Should I be worried?
We’ve put a lot of power into a small portable power unit, so if you use the highest levels you may notice that the LED lights dim or flash. This is nothing to worry about. It’s just more power going to the pump motor.
Why do I have to use a Tommee Tippee bottle?
The Tommee Tippee Made for Me™ Electric Breast Pump is designed to be a perfect fit for Tommee Tippee bottles and breast milk pouches (excludes Tommee Tippee Closer to Nature glass bottles). You may get leaks and spills if you use other brands of bottles and containers that don’t fit correctly.
Will milk get sucked into the power unit?
No. If you have fitted the diaphragm and cap properly, the air tube and pump are separated from your milk and can’t come into contact with the power unit. It’s what’s known as a closed pump.
Help – there’s no or very little suction. What can I do?
It’s most likely that there’s some air getting in somewhere, which means the pump won’t work properly.