Subscribe to Save
Subscription orders can be cancelled at anytime. Free delivery on all subsequent subscription orders. Find out more about subscriptions.
Why parents love our subscriptions...
-
They’re easy and fuss free
-
Your products are automatically sent to you
-
You save up to 10% when you sign up for a subscription
-
You can cancel at any time

Steridryer Electric Steam Sterilizer and Dryer
Thank you for purchasing a Tommee Tippee Steridryer Electric Steam Sterilizer and Dryer. This product support page is here to help you learn how to use, clean and care for your sterilizer, and to help with any queries you may have.
What’s in the box?

Before first use
You must insert the filter provided into the underside of the sterilizer base before you start using the sterilizer and dryer.How to use
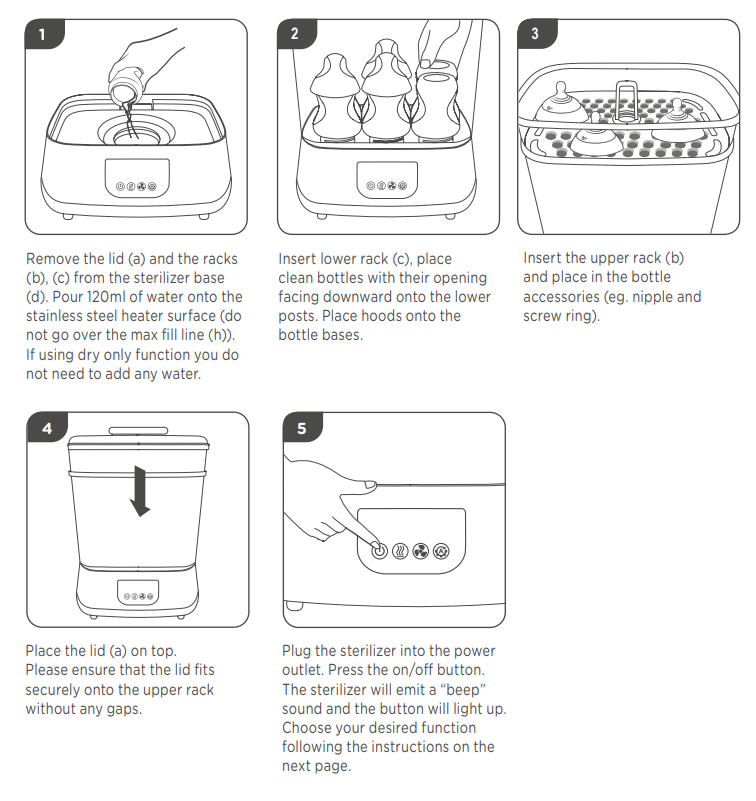
It is important that all bottles, nipples and accessories are empty and that they are clean and fully rinsed in fresh water before placing in the appliance for sterilization.
Use on level surface and be sure there is no debris under the unit and the rubber pads are touching the surface.
This sterilizer is designed for use with Tommee Tippee bottles and feeding accessories (except bottle brush).
The sterilizer will hold a maximum of 6 Tommee Tippee Closer to Nature bottles (maximum 4 Advanced Anti-colic bottles) or a combination of fewer bottles plus soothers and breast pump parts.
How to replace the filter
It is recommended to change the filter every 6 months. The filter is found on the underside of the sterilizer base (j).
To change the filter:
- Unclip the filter panel door (k) and remove old filter.
- Place the filter (l) into the sterilizer base, making sure that the tab handle is still visible on top of the filter (m).
- Place the filter panel door back onto the sterilizer base (j).
Manual
Still need help?
If you’re still looking for an answer, get in touch with us here

STERILIZE AND DRY
- Press the Automatic sterilize and dry button once. The appliance will beep once and the sterilization cycle will start. The sterilizing time is approximately 10 minutes.
- When the sterilizing cycle is complete, the drying cycle will follow automatically. The drying time is approximately 30 minutes.
- When the drying cycle is complete, the appliance will beep 5 times and power off automatically. Please allow to cool for at least 5 minutes before opening the sterilizer.
STERILIZE ONLY
- Press the sterilize button once. The appliance will beep once and the sterilization cycle will start. The sterilizing
- When sterilization cycle is complete, the appliance will beep 5 times and switch off automatically. Please allow to cool for at least 5 minutes before opening the sterilizer.
CAUTION! If you need to drain water from the base, always pour sideways away from the air vent in the direction marked inside the base.
DRY ONLY
- Press the dry button once. The appliance will beep once and the drying cycle will start.
- The drying cycle is approximately 30 minutes.
- When the drying cycle is completed, the appliance will beep 5 times and switch off automatically. Please allow to cool for at least 5 minutes before opening the sterilizer.
Please note: The sterilization and/or the drying cycle can be stopped any time by pressing the on/off button.
Guidance on how to clean and maintain your Steridryer
Unplug and allow to cool before cleaning. After each use pour away remaining water from the sterilizer base by tipping the sterilizer and dryer sideways over a sink, ensuring no water gets into the air vent (i), and wipe clean with a damp cloth only. The lid (a) and the two racks (b, c) can be cleaned in hot water. Do not clean with abrasive cleaners.
Please note
WARNING!
TO AVOID THE RISK OF ELECTRIC SHOCK, INJURY OR DAMAGE: ALWAYS UNPLUG YOUR PRODUCT BE-FORE CLEANING. DO NOT IMMERSE THE BASE, THE SUPPLY CORD OR THE PLUG IN WATER OR OTHER LIQUIDS. DO NOT CLEAN BASE UNDER WATER TAP.
DO NOT use metal objects or scourers to clean your Sterilizer and Dryer. DO NOT use bleach or sterilizing fluid to clean it.
DO NOT use abrasive or anti-bacterial materials.
DO NOT scrub the heat plate.
CAUTION! UNDER NO CIRCUMSTANCES USE ABRASIVE, CORROSIVE OR SCRATCHING CLEANING AGENTS, AS THESE COULD DAMAGE YOUR STERILISER.
Please note: If there is insufficient water to complete the sterilization phase effectively, the appliance will ‘”beep” 5 times and the function light will flash for 2 hours. Do not use the bottles or accessories. Repeat usage instructions to ensure effective sterilization. Drying time based on 260ml / 9oz bottles. If you are using larger bottles, then extra drying time may be required.
De-scaling
The guide below shows what the frequency of de-scaling should be.
Hard water: 14 days
Medium: 21 days
Soft: 28 days
You can find out your water quality from your water provider. Unplug the unit and allow to cool before descaling.
After each use pour away remaining water from the unit base by tipping the unit sideways over a sink and wipe with a damp cloth only. We recommend that you descale your appliance according to the guidelines above to ensure that it continues to work efficiently. Living in a hard water area can produce limescale quicker than other areas so descaling is required sooner.
Use a descaler that is suitable for use with stainless steel and use as per the manufacturer’s guidelines. Or you can use white vinegar or a descaling sachet to descale your unit. Please use as per manufacturer’s guidelines. Where no method is stated, 1:4 descaler to water ratio can be applied.
Manual
Still need help?
If you’re still looking for an answer, get in touch with us here
If you’re experiencing issues, follow our troubleshooting advice below:

We’ve prepared some common questions and top tips to help you with your new Steridryer.
Do I really need to sterilize my bottles?
We recommend that you do, but it’s entirely your choice. The main reason for using a microwave or electric sterilizer is that they’re guaranteed to reach the 100°C needed to kill off harmful bacteria that can build up in milk, and you don’t get that guarantee with a dishwasher.My sterilizer isn’t working – what can I do?
We’re really sorry to hear that! Please follow the steps below to get your unit working again…
- Check the mains lead is plugged into the unit and the mains socket is switched on.
- Check the fuse is in the plug (in a UK plug only)
- Check the socket by plugging in another appliance
- Check the sterilizing by plugging it into another socket
If you’re still experiencing issues, please contact us here
Should I get a lot of steam whilst the unit is on?
Not really. If you have way more steam than you’d expect, it could be that you’ve just got a few too many items inside. Check that items are correctly loaded into the sterilizer. There are marked areas on the trays to show where to put your bottles, and if you’re popping other items like teethers or soothers in, just be sure to space these out evenly.
Don’t overfill the machine with too many products as this reduces how efficiently the sterilizer works and it may not sterilize properly.
The correct amount of water is 3oz. More than 3oz of water in the sterilizer base will increase the cycle time. Less than 3oz may not sterilize the items properly.
Why are my bottles are coming out of the sterilizer with chalky marks?
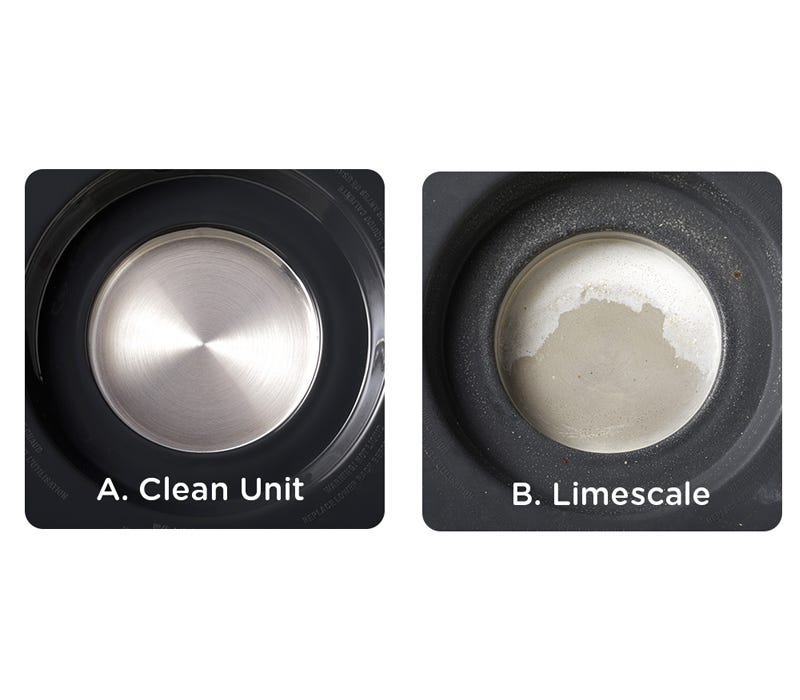
If you are seeing chalky residue on items in your sterilizer, that’s a sign that it needs descaling. Please refer to the descaling instructions.
To help you identify limescale; here’s a picture of your heat plate fresh out the box, (A) and here’s a picture of a heat plate that hasn’t been descaled (B). If you notice a dark brown appearance, this is likely to be burnt on limescale which means you may need to descale the machine over a longer period e.g. overnight, or up to 24 hours.
There are flaky bits in the machine - what's causing it?
This will be due to a build-up of limescale that's loosened from the heat plate at the base of your machine, so we'd recommend giving it a good descale. We recommend using a descaler that’s suitable for use with stainless steel i.e. kettle, iron, and coffee machine de-scalers. Use as per the manufacturer's guidelines.
It’s vitally important to regularly descale your sterilizer to avoid operating issues and damage to the heat plate, which is in the bottom of the machine.
Should there be water left in the bottom once its finished?
Yes, it’s pretty common to have droplets of water remaining, the majority of the 3oz water should have evaporated during the sterilization cycle. Just empty it out once you’re finished and dry thoroughly to use again.
Why does my heat plate look rusty?
This will be due to limescale. We recommend using a descaler that is suitable for use with stainless steel i.e. kettle, iron and coffee machine de-scalers. Use as per the manufacturer's guidelines.
If you notice a dark brown appearance, this is likely to be burnt on limescale which means you may need to descale the machine over a longer period e.g. overnight or up to 24 hours.
Why do my bottles still have marks on after I sterilize?
The chances are the marks are milk residue. Sterilizing removes bacteria, but bottles still need to be washed beforehand to remove any bits of milk clinging on inside. Warm soapy water will do the trick - thoroughly wash, then rinse and pop them in your sterilizer.How should I store my sterilizer?
If you want to store your sterilizer to use again, we’d suggest that you run a full descaling program to ensure all limescale is removed and to give it a clean. Ensure the unit is thoroughly dry and securely wrapped in bubble wrap and cardboard to keep it nice and snug. When deciding where to store it, we’d suggest somewhere nice and dry to avoid any damage.Should I dry the bottles before using them?
Thankfully, you can cross this off your to-do list. Any water left inside the bottles after sterilization is sterile and won’t collect germs, so there’s no need to dry. In fact, wiping the inside of a bottle after sterilization could add even more germs, so it’s best not to!How do I reassemble my bottles when they’re ready?
Just reassemble as normal, but wash your hands thoroughly first, or use a pair of nipple tongs if you have them. The idea is to keep the bottle as clean and sterile as possible.
If you don’t want to leave them all in the sterilizer for the 24-hours, you can reassemble all bottles straight away and store them in a dry location. The fully assembled bottles will be ok to use for the same 24-hour period. Any unused bottles, after the 24 hours should be popped back in for a fresh sterilizing cycle.
Manual
Still need help?
If you’re still looking for an answer, get in touch with us here

