Ultimate XL Nappy Disposal Bundle with 18 Refills
Bundle & Save 40%
Subscription orders can be cancelled at anytime. Free delivery on all subsequent subscription orders. Find out more about subscriptions.
They’re easy and fuss free
Your products are automatically sent to you
You save up to 10% when you sign up for a subscription
You can cancel at any time

Thank you for purchasing a Tommee Tippee Quickcook 6 in 1 Baby Food Maker. This product support page is here to help you learn how to use, clean and care for your Quickcook, and to help with any queries you may have.
Complete set up section before first using the unit.
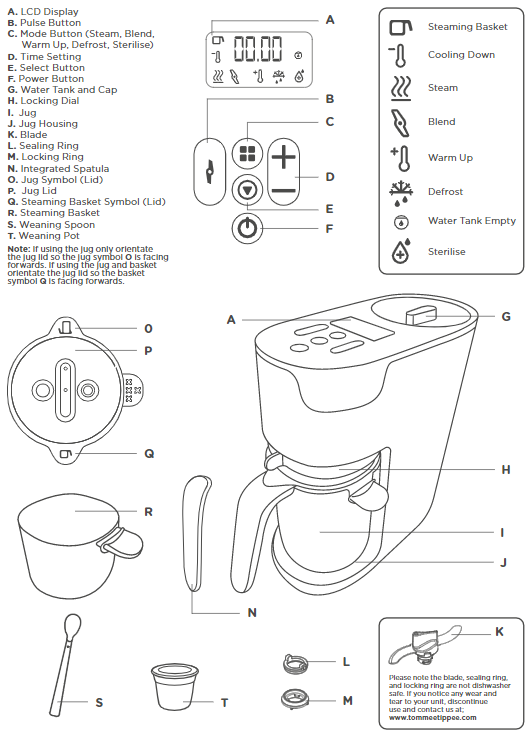
Please refer to instructions leaflet before use and remember to clean and descale your unit regularly. WARNING! Handle the blade carefully as it is extremely sharp. Care should be taken when handling the sharp blades, emptying the bowl and during cleaning.

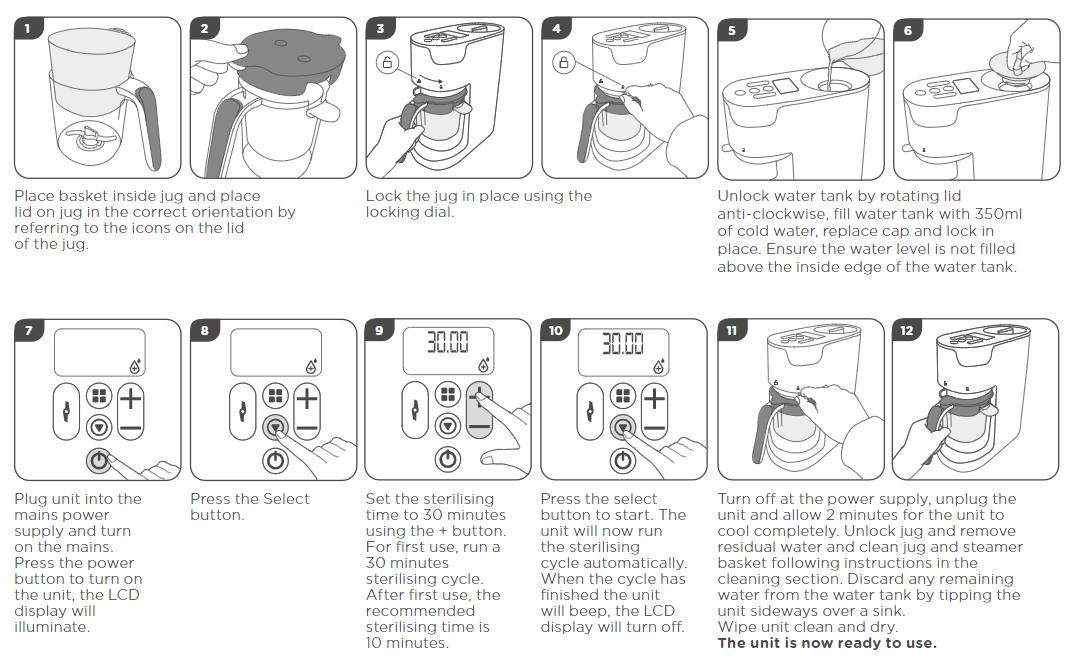
Complete this set up section before first using the unit.
Wash blade, jug, basket, sealing ring and lid in soapy water then dry and reassemble (see Reassemble Blade instructions). Place unit on a clean, dry kitchen work surface.
For your child’s safety always check food temperature before feeding. This unit can steam and blend vegetables, fruits (peeled and cored/pips removed), meats and fish (with bones removed). All food must be diced into approximately 1-2cm cubes before being placed into the jug or basket for cooking. Cooking times can be found in these instructions and for recipes visit tommeetippee.com. During the steaming process hot steam passes through the vent at the back of the unit. Position this unit away from walls and make sure it is not underneath any overhanging shelves or cabinets.
a. TO SET AN AUTOMATIC STEAM TO BLEND CYCLE: Use jug with no basket, ensure correct lid orientation.
b. STEAM AND BLEND WITH BASKET: Reduced water for a chunkier texture.
c. TO SET A STEAM ONLY CYCLE: Our recommendation is to use the basket, especially for baby stages where a chunkier texture is required. Please ensure lid is in the correct orientation.
d. TO SET A BLEND ONLY CYCLE: Use the jug with no basket, ensure correct orientation with lid.
The descaling process will remove deposits of calcium and other minerals in the system that may affect its performance.
Turn off at the power supply, unplug the unit and allow unit to cool down completely before cleaning. Before first use and after every use wash the jug, lid and basket in warm soapy water or use a dishwasher (top shelf only) and dry thoroughly. Wash the blade, sealing ring and locking ring in warm soapy water and dry thoroughly.
PLEASE NOTE THE BLADE, SEALING RING AND LOCKING RING ARE NOT DISHWASHER SAFE.
WARNING! Handle the blade carefully as it is extremely sharp. Care shall be taken when handling the sharp blades, emptying the jug and during cleaning. After every use wipe the jug housing with a damp cloth but do not submerge in water. Do not clean with abrasive cleaners or allow to come in to contact with solvents or harsh chemicals, damage could result.
You should descale the water tank of your Baby Food Maker every 4 weeks, however if you notice limescale earlier, descaling may be required sooner. Unplug the unit and allow to cool before cleaning. After each use allow to cool before pouring away remaining water from the water tank by tipping the unit sideways over a sink. A build-up of limescale can negatively affect the performance of the unit. Living in a hard water area can produce limescale quicker than other areas therefore descaling is required sooner. Use a descaler that is suitable for use with stainless steel and use as per the manufacturer’s guidelines. Alternatively, you can use white vinegar to descale your unit, please use as per manufacturer’s guidelines. Once you have descaled then follow instructions under SET UP to perform a final cleaning cycle. You may need to repeat the process if you find that limescale is still present. DO NOT use metal objects or scourers to clean your unit. DO NOT use bleach to clean the unit. DO NOT use abrasive or anti-bacterial materials.
The machine will prompt you to run the sterilising cycle every time you turn on the unit. If you prefer to follow the instructions on how to operate the Baby Food Maker, please visit our website: www.tommeetippee.com
We recommend that you run a sterilisation cycle before first use and before batch cooking.
STERILISING COMPONENTS
It is important that all accessories are clean and fully rinsed in fresh water before placing the appliance for sterilisation.
The steriliser of accessories is designed for use with small items like soothers or bottle teats. To sterilise components, place the accessories in the steaming basket and run the sterilising programme.
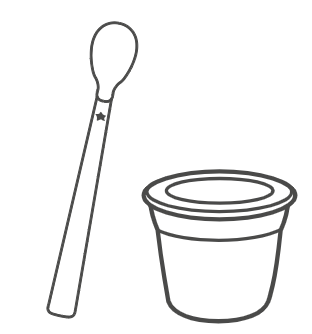
Four storage pots are included in your box. We recommend using these pots to store and warm up the food prepared using your Baby Food Maker. Using different plastic storage pots might result in different warm up times and results may vary.
Always use the storage pots provided to store and freeze the food prepared using your Baby Food Maker.
The unit is intended for blending pre-cooked ingredients, blending liquids and soft fruits. The unit is not designed to blend hard ingredients such as ice cubes. Make sure the jug is not filled past the MAX line marked on the jug. Refer to the blending times table for guidance on different food textures.
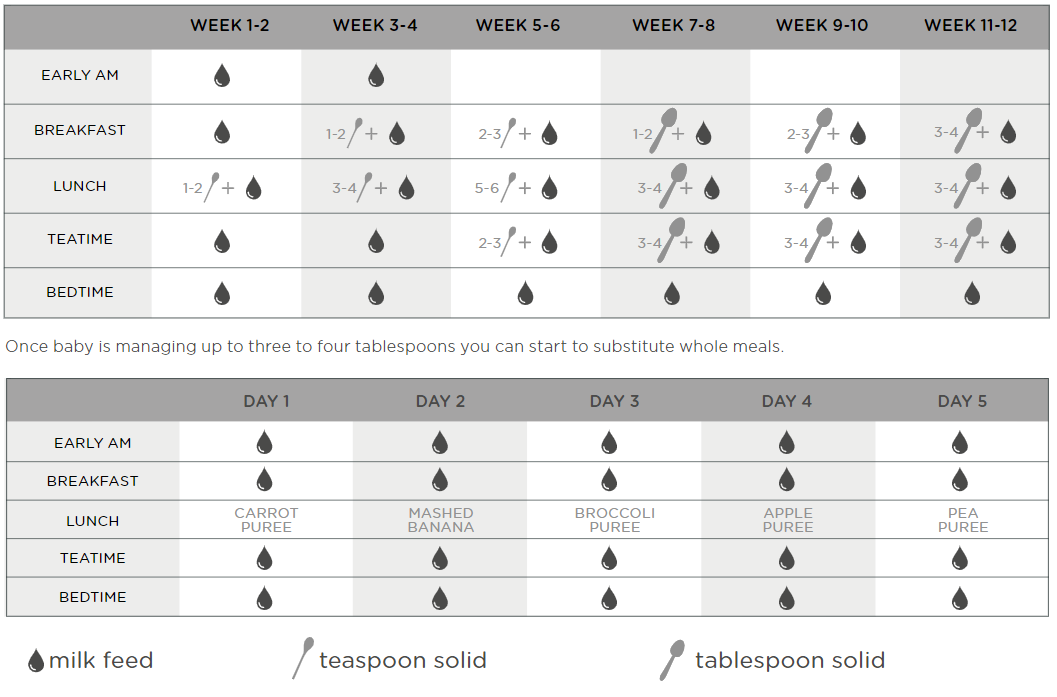
To help with your weaning journey find more information about the Tommee Tippee Baby Food Maker, and recipes at www.tommeetippee.com.Department of Health recommends that solid food should not be introduced before 6 months. Although you can start earlier (but not before 4 months) if advised by your health visitor or GP.
For your child’s safety and health WARNING!
Always use this product with adult supervision. Accidents have occurred when babies have been left alone with feeding equipment due to the baby falling or if the product has disassembled. Before each use, inspect the product. Throw away at the first sign of damage or weakness. Always check food temperature before feeding. Heating in a microwave oven may produce localised high temperatures. Take extra care when microwave heating. Always stir heated food to ensure even heat distribution and test the temperature before serving.
CLEANING
Before first use, clean the product. Clean before each use. Always wash the product immediately after use. Wash in warm soapy water and rinse in clean water or use a dishwasher (top shelf only).Do not clean with solvents or harsh chemicals.
STORAGE AND USE
Do not store or leave in direct sunlight or near a source of heat. Do not store with or allow to come into contact with solvents or harsh chemicals. Do not allow product to come into contact with oil based foods (e.g. oil/tomato based sauces) as staining will occur. Not suitable for use in a conventional oven or a combination microwave oven with the grill feature switched on. Do not heat in the microwave with the lid sealed. Remove lid before placing in a microwave. Keep all components not in use out of reach of children.


1. Do not use the unit for anything other than the intended use. This unit is not suitable for:
a. Cooking rice, noodles and pasta
b. Chopping hard ingredients such as ice cubes and sugar lumps
c. Cooking frozen foods
2. Do not use before water tank is filled with water, unless using the blend only cycle
3. During the automatic steam and blend cycle, the blades will turn to circulate the food. The unit is designed to do this and is a normal part of cycle
4. Once a steam and blend, steam only or blend only cycle has been set, if the jug has not been assembled correctly and the start button is pressed to start a cycle, a beep will sound.
5. The unit will not start operating if the lid is not placed on the jug before locking into place (Error Code E2), if the lid has not been placed on the jug in the correct orientation (Error Code E2), or if the basket has not been placed in the jug correctly. (Error Code E2).
6. If the jug is loosened or removed from the unit during a cycle, it will automatically stop, a beep will sound and (Error Code) E2 will be displayed. The cycle will be paused, and the unit will return to standby state until the jug is put back and fixed in place, to continue the cycle, press start button.
7. (Error Code E1) In the unlikely event that the water tank boils dry during steaming the unit will beep and the LCD will display error E1. If this occurs, you will need to re-start the cycle and replace the food. Unplug the unit, allow the unit to stand for 2 minutes before filling the water tank with 350ml of cold water. Re-set cycle following the instructions in the usage section.
8. Quickly set the timer by holding down the + and – buttons.
9. If you find that your machine is not working as efficiently as it was, we recommend carrying out the descaling process as there may be a build-up of limescale.
10. Do not use the Baby Food Maker without food in the jug or steaming basket, except for the sterilising programme. If this happens press the cancel button.
11. If the unit stops working during operation or after it’s been used for longer cycles, please disconnect the unit from the main power supply and let it cool down for 10 minutes before using it.
This product is covered by our exclusive two-year warranty when you buy directly from us! For full terms and conditions, please click here.
This Warranty covers Products for two years from the date of purchase.
We will keep a record of when you purchased your Product in your Tommee Tippee account, there is no need to register.